We give you our top 5 tips for advertising your board game and how to learn which sources are best for you and your game. This is a little more focused on ads for a Kickstarter campaign, but is applicable to any type of advertising for a board game.
We continue with our top 10 mistakes new designers make with a list from the designer perspective, led by Jeremy Commandeur. Learn what you can avoid and tell us if we missed any big ones in the comments!
Smash Up’s Awesome Level 9000 expansion brings in 4 new factions and the Talent ability. Talents can be used once on your turn and have an impact on the strategies and tactics to use with each faction. Don’t forget to use your talents!
The new factions that are added are all usable and none are overpowering. There is enough randomness in which cards you draw that any combination can win, however, you can get a significant advantage if you find a faction combo that works well together. I’m going to go through each faction, discuss combos and other tips for playing them more effectively, and tell you which factions are good pairs for each. The video below covers all 4 factions or continue reading what follows it for the text version of the analysis. If you care about only a specific faction, you can watch the video that covers that single faction.
Bear Cavalry
Bear Cavalry is a control faction that has a surprising amount of muscle to render opponents’ small minions ineffective. The standard operating procedure is to lay claim on a base with a Cub Scout, and then you move any smaller minions of your opponents over to that base to kill them upon landing. You may want to pair them with a faction that increases the power of your Cub Scouts, like the Dinosaurs who have their augmentations, so that you can kill even larger minions.
High Ground is arguably the best card in deck for the Bear Cavalry as it is the key to an even more powerful combo than Cub Scout, and can be used along with all of the minion moving cards at your disposal to kill ANY of your opponents’ minions. If you can get that card in play, you will very likely win the game. You never want to rely on a single card in the deck, but even if you get it out and it is destroyed, you have cards that can bring it back.
This faction can be paired with many other faction with success. My favorite is probably Pirates because it is similar in its ability to move minions and destroy them as well. You can really control the game with those two and take advantage of the Cub Scout and High Ground moving combos. Overall, I believe Bear Cavalry is the best out of this bunch.
The Secret Grove is an annoying base for them because they don’t have any minions small enough to take advantage of it. But don’t worry, the Bear Cavalry faction has two bases tailored to their style: Field of Honor and Tsar’s Palace. Tsar’s Palace is a good place for a Cub Scout because it forces opponents to play their smaller minions somewhere (to be moved here) but Field of Honor and Bear Cavalry may be the best faction/base combo in the game. If this base comes out and you can make it your killing grounds, you stand to gain tons of victory points, while still destroying opponent minions. A.K.A. You win.
Ghosts
Ghosts rely upon keeping your hand limit very low to get various powerful bonuses. The bonuses increase minion power, bring back minions from the discard pile, take control of someone else’s minion, or gain 1 VP. Any time in Smash Up where you see “1 VP” on a card, pay very close attention, because those cards are often the difference between winning and losing and are so much easier to get than winning bases.
This faction is based largely on timing. They have a wide array of great cards, but they usually have restrictions on how many cards you have in your hand that will affect how helpful they are in your current situation. They don’t have a lot of minion power, but Spirit is their bread and butter because it’s a power 3 minion, which is good, it allows you to discard a bunch of cards, which you want, and it lets you kill an opponent’s minion.
They are an ab0ve-average faction on their own, but the hard part is pairing them with another faction. Most factions want to gain the card-advantage to provide more options, but this one needs fewer cards to really shine. If possible, you will want a faction that will get some kind of benefit for having cards in the discard pile, such as Zombies who bring minions back from the dead or the Steampunks who can easily recover the valuable lost cards in the discard. The fact that Ghosts don’t play well with others forces me to label them as the weakest faction of this expansion.
The two bases added for the Ghosts are The Dread Gazebo and the Haunted House. The Dread Gazebo is good for them because base actions are not very important to them, but the Haunted House is the one they really love because they don’t mind discarding cards, while it will really hurt other players to do so.
Killer Plants
The Killer Plants are a very solid faction in this expansion. Their Water Lily minions will ensure you get a steady stream of cards coming into your hand, which should give you the card advantage over your opponents and allow you to make efficient use of your turns by almost always providing you with both a minion and action to play. However, they are fairly dependent on when you draw certain cards and because they let you search through your deck for cards, they tend to go into a slump once your deck runs low until you get to re-shuffle your discards into it.
This leads us to another core component of the Killer Plants: the Sprout. They let you pull a power 3 or less minion from your deck, and play it as an extra minion to replace the Sprout, so if you can pair that with a faction that has a 3 or less minion with a summoning bonus, you can take full advantage of these guys sprouting out all over the place. Getting Sprouts early is great, but you will find your deck sputtering if you’re unlucky enough to pull these in the bottom half of your deck because you won’t have many cards left to search. Another downside is that playing one minion ends up removing two from your deck, which means you’ll be drawing fewer in the future. This is where you’ll need the Water Lily card drawing to keep those minions flowing. If you can get a bunch of minions in your hand, you can often play more than one in a turn to surprise your opponents with a big power boost coming our of nowhere and triggering a base score.
You can think of Plants as a great support faction because they will help you with your card advantage and allow your paired faction to pile onto those bases. Combining these guys with a faction like Ghosts won’t work very well because the Ghost benefits you get from having few cards in your hand will not apply when you’re drawing extra cards from Killer Plant abilities. Since this faction allows you to pop out lots of small minions, it works well with a mobilization faction like Bear Cavalry or Pirates because you can distribute all your little plants among the bases to put the numbers in your favor before scoring. Otherwise, get Robots or Zombies or another faction that has a lot of little minions to overwhelm opponents.
The Secret Grove base will help you get your Sprouts out even quicker, but will help your opponents just as much as you unless they don’t have any small minions. The Greenhouse was added for the Killer Plants but will definitely help opponents as much as you, or more, since you may have already searched through your deck to find the minions you want to play while this will probably be their only way to do it.
Steampunks
The Steampunks are another solid faction, but will be better in support of another faction, however they have some extremely powerful base actions that can get you a victory no matter who is paired with them.
Base actions are the Steampunks’ specialty. The Rotary Slug-Thrower gives each minion at a base +2 power and the Aggromotive will give you a +5 power advantage. WOW. You don’t need much beyond those to win bases and games. Other Steampunks cards will help you recover or protect your base actions, so it will be hard for your opponents to throw a meaningful wrench into your machine. If possible, pair them with a faction that has many/good base actions, such as the Tricksters from the base game.
The Difference Engine is great to help get you a card advantage over your opponents, especially when played on a high breakpoint base or in a game with fewer players. Their minions aren’t bad either. Captain Ahab has a Talent that lets him move to a different base on his turn, so don’t forget to use that to your advantage whenever possible. The Steam Men get a bonus for base actions, so they are almost always a 4 power minion. They don’t have a stand-out bomb minion, but their machines are solid and dependable so you can hang in there in any base battle.
For bases, the Workshop is the best one out there for them, but the Inventor’s Salon is handy too. The Dread Gazebo doesn’t let you play actions on it so that one you pretty much have to forfeit when it drops. In general, bases do not have much of an affect on the way the Steampunks roll.
You have before you a strategic analysis of the game King of Tokyo. This game’s simplicity makes it appeal to a casual gamer (even young ones), but the decision-making can entertain even a hardcore probability-crunching, math nerd.
One of the coolest things about this game is that it was designed by Richard Garfield, who designed the collectible card game Magic the Gathering. In many ways, this game defined my childhood, taking me on quests for the perfect combination of cards to destroy my friends in our parent’s basements. But even as I have grown up, I have found myself drawn back into the Magic universe every once to play in tournaments or check out the latest sets, and that makes me realize what an incredible game Mr. Garfield designed so long ago.
But we’re here to talk about King of Tokyo, specifically the base game. Per my usual style, I will assume you already know the rules so I don’t have to spend time explaining them and I can get right to the strategy. Note that strategies change significantly in the expansions, so I will be covering them in separate analyses. Check out the video version immediately below or continue on for the text version.
I am going to go through each strategy very concisely at first and then follow it up with a more detailed analysis.
High-Level Strategies
These are the three most viable strategies you can employ in a game of King of Tokyo:
Aggressive – Try to kill all of your opponents.
Passive – Roll only for victory points.
Technology – Buy upgrades that will improve your efficiency.
In general, you will do better if you choose one of these strategies and commit to it rather than bouncing around between them, but it is possible for a hybrid strategy to work. Although committing is best, it’s common for a strategy switch near the end of the game to help put you over the top, either switching into rolling exclusively for attacks to finish off your opponents or exclusively for victory points to try to win the race to 20 victory points. Now I’ll go into each of these strategies in a little more depth.
Aggressive Strategy (Attack)
The goal of this strategy is to try to kill your opponents without worrying about victory points.
When you’re rolling the dice, you’ll want to go pretty much exclusively for attack rolls except when you need to heal or there is an awesome attack upgrade that will improve your efficiency in killing your opponents.
If you can manage, you want to begin your turn inside Tokyo, not for the bonus VP you get from it, but because you are now damaging all of your non-Tokyo opponents. So being inside Tokyo is the best way to do massive damage, but you will find that you will often land your death blow when you are outside Tokyo because whoever is inside couldn’t heal and they stayed in there just a bit too long.
In some ways, this strategy is best with fewer players, because more players mean more monsters to kill and more time for one of the monsters to get 20 victory points before you can kill them. But another way to look at it is, the more players there are in the game, the more damage is being thrown around, so this can definitely work in a larger game too. More importantly, the more players there are, the longer it is between chances for each player to heal because there are more player turns in between each of their turns, which means they will be easier to kill.
A key here is not to get distracted by unnecessary item purchases, getting energy, or rolling for victory points. You should be almost completely focused on ATTACKING. The only time you should take a break from attacking is to heal up or get enough energy for an attack-boosting upgrade.
Passive Strategy (Victory Points)
Here you just roll for all victory points and don’t worry about doing damage to your opponents.
In 2, 3, and 5 player games, it’s best to be in Tokyo for this strategy since you get 2 points before even rolling anything, which is 10% of what you need to win the game. Otherwise it’s too deadly to try to say in there because the player ratios will make it too deadly, causing you to spend precious rolls on healing instead of VP once you leave. When you have the full force of 3-4 people attacking you from outside Tokyo, you probably won’t last a whole round to get your extra 2 victory points, and even if you do, you’ll spend a few turns healing up instead of going for VP dice combos. So for this strategy in games like these, if you find yourself inside Tokyo, just get out as soon as you are attacked… but I’ll talk more about differences in player numbers later.
For this strategy, ignore attacking completely with the exception of dealing a death blow to someone who stayed in Tokyo one turn too long expecting you to keep up your victory point focus. Knocking someone out of the game is almost always the right decision unless they are not challenging you for the most VP because then it’s just a waste of rolls as you might as well keep working on gathering victory points.
Technology (Buying Cards)
Here you go for energy points and buy sweet gear for your monster.
You probably won’t win the game by sticking to this for the entire game because your opponents will focus on either attacking or victory points and you won’t be able to keep up with them, however you can do well to use this in the early game. This is, however, the most fun strategy to play because some of the cards you can get really let you mess with your opponents or pull off some really good combos.
If you go for this strategy, initially, you will roll exclusively for energy. Then you buy some awesome upgrades and slowly change your strategy to either aggressive or passive based on those items’ abilities. This allows you to be more flexible as you adapt to the current game state during the mid-late game based on opponent strategies and the upgrades you acquire. You won’t want to wait too long before committing to one of the other strategies though because if you do, you’ll be so far behind your competitors that even your decked out monster won’t be able to catch up in time.
Number of Players
The number of players in the game GREATLY modifies the strategies you should be using. Here is a table of the number of players and how deadly or not-so-deadly, it is to hang out in Tokyo based on the players. The darker the red, the hotter it is in Tokyo and the less appealing it is to try to last a whole turn in it.
In a 2-player game, you might as well stay in Tokyo as long as you can to keep grabbing those free victory points. You’ll want to be more aggressive outside of Tokyo to get your opponent to yield it to you because it’s often the player who can stay in the longest in a 2-player game that will win.
In a 3-player game, you have 1 monster against 2 monsters, which isn’t great for someone in Tokyo, but is often worth it to get an extra 2 points if they can last until their next turn. It’s usually not too hard to stand up to two attacks in a row and should be worth it to get 2 victory points.
When you go up to a 4-player game, you now have 3 players attacking the one player in Tokyo. If you last the whole round in Tokyo with 3 players attacking you, your life will be hanging on by a thread when you are next able to escape and you’ll have to spend a few turns healing, so this is not a good player ratio to try to stay in Tokyo.
In a 5-player game, the ratio improves for the player in Tokyo because it’s now 2 on 3. You might as well stay in Tokyo as long as you can because even outside of Tokyo, you’ll still have two players attacking you.
With 6-players, the ratio isn’t too bad in 4 on 2, but you still have FOUR PLAYERS attacking you when you’re in Tokyo, so it will be hard to tough it out until your next turn. You usually just want to focus on a more passive strategy from outside Tokyo so you can stay alive.
Just keep in mind with all of these, that these ratios change as monsters perish, so if you were playing a 4-player game and wanting to stay away from Tokyo, as soon as a monster dies, it becomes a 3-player game and much more lucrative to hang out in Tokyo.
Probabilities
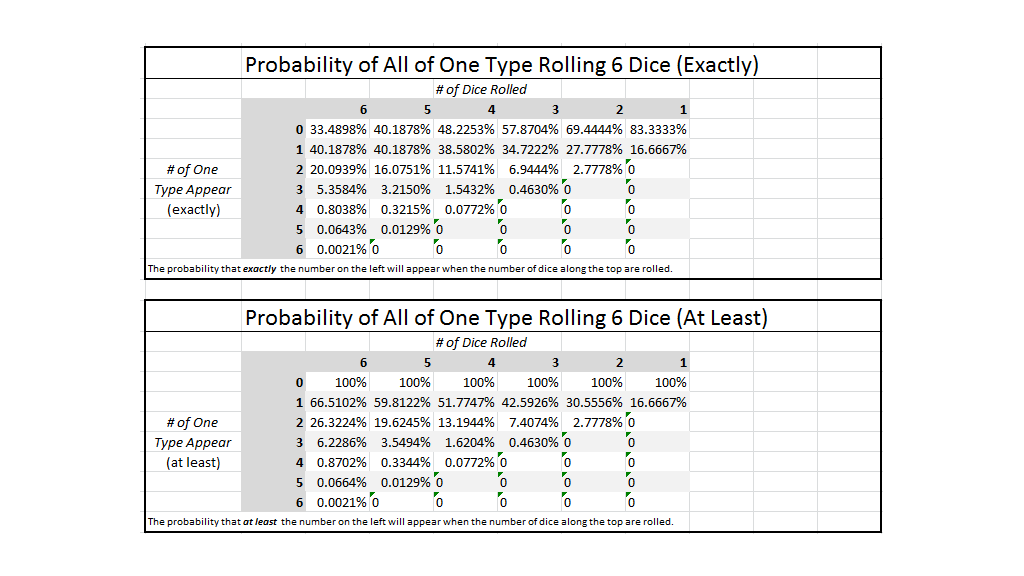
When you roll a King of Tokyo die enough times, the probabilities will all even out so that each side will appear 16.67% of the time. The problem is, a game of King of Tokyo is so short that you don’t have time to wait for the probabilities to even out, which makes it hard to plan your strategy.
If you have a fear of math, you should probably skip this section. Otherwise, take a look at these tables.
It’s a kind of cheat sheet for the main dice-rolling probabilities you will need in this game. There are actually 2 different tables depending on your dice-rolling intentions. For both, you can look on the top to find the number of dice you’re rolling and then you can look along the left to find how many of one type you hope to roll. If the probabilities look low to you, keep in mind that this is for rolling a particular face, like the attack, not for just rolling “3 of any one kind”, for example. This is a very important distinction when you are interpreting these tables.
These probabilities were created using the Binomial Distribution, which is not a trivial concept, so to avoid spending time teaching a statistics class on this subject, just trust that they are correct or send me a message on some kind of social media or my blog and we can have a fun stats discussion. Download these tables right here in Excel format to mess around with them:
Of course you probably don’t want to bring this cheat sheet to a game night or you will be mocked, hated, and targeted throughout the game, so it’s more of a pre-game-night refresher of how likely the rolls will be that you may encounter.
General Tactics
Be very careful with your life. Try not to go below 6 life when you’re in Tokyo because it’s very hard to get that life back by getting hearts, and you’re usually not being very productive in attacking or getting victory points if you’re always worried about dying.
If you are in Tokyo and you won’t easily make it to your next turn without getting close to dying, get out ASAP because if you stay and then a couple of other monsters do damage to you forcing you out before your next turn anyway, you just took extra damage from those monsters unnecessarily.
A formula for whether to leave Tokyo that I have used successfully is:
3 * (turns left before your turn, including your turn) > (your current life)
If you get attacked and this formula is false, get out now. So basically, assume you will take 3 damage per turn. Of course there are other factors too like you know one of the other monsters is about to die and will do anything to not attack you to avoid going into Tokyo or someone is clearly going for a passive strategy and likely won’t attack you on purpose, you can assume you will only take 1 attack from them while deciding whether to stay in Tokyo. Of course this is just an estimate so you can feel free to trust your gut too!
Conclusion
These strategies are often starting points and will need to be modified or abandoned in the mid or late game depending on your opportunities. The strategies and tactics you use also greatly depend on those that others use. If everyone is fairly aggressive, you can still beat them with the aggressive strategy by staying 100% committed to it while they occasionally get distracted by some non-attacking upgrade purchases or going for victory points. Basically, you can do it better than them if you are more committed.
Still, there is a ton of luck in this game as the dice rolls can defy your strategies. Although the decisions you should take are very clear over thousands of games, each single game of King of Tokyo involves so few rolls for each player, that even playing perfectly will only give you a small edge.
Lords of Waterdeep is often regarded as a gateway worker-placement game. It’s not a gateway game for someone new to strategy tabletop games, but it’s more of a step up from Catan or Ticket to Ride. It does such a great job of keeping the game short, but still taking you through the engine-building process of most worker-placement games. This will serve as a strategy primer for the base game that covers the most critical strategies and tactics you need to keep in mind to optimize your play. Watch the video version immediately below or the text version that follows it.
Economy
It’s no secret that the goal of this game is to maximize your victory points by the end of the game. To do that, you need resources, whether it be adventurers or gold. These resources are all roughly equivalent:
Keep this in mind as you decide on the quests you acquire or which resource you chose when you are faced with options. Early in the game, you almost always want to choose Clerics and Wizards over Rogues or Fighters since they will help you complete higher VP quests as the game progresses. Once you get towards the end of the game, this distinction isn’t as important because you are more concerned with just completing a few specific quests before the end of the game.
Game Progression
Early Game (Round 1-3)
Primary Goals:
Build buildings that are valuable to opponents with output that will help with your lord’s quest types.
Gather quests of your lord bonus types, focusing on plot quests that will give you useful bonuses for building your engine.
If you cannot get plot quests, you will want quests that give adventurers as output so you can use them as input to other quests to increase your efficiency.
Your highest priority in the first few rounds is to buy good buildings that will be valuable to opponents and help you complete your quest types. In order to keep buying buildings in the early game, you will spend most/all of your first 9 actions on the Builder’s Hall, Castle Waterdeep to take the first player marker, or Aurora’s Realms Shop to acquire gold. It may feel like you are wasting actions, but it is well worth it to get early buildings that will benefit you throughout the rest of the game. You can stray from this if the buildings available are not very good or continue it even after the first 3 rounds if the buildings are particularly outstanding. Controlling Builder’s Hall will take anyone who is Larissa Neathal (the building lord) out of contention while ensuring the buildings that get onto the board will provide additional opportunities to get the adventurer types that will help you complete your quests.
Any additional actions should go towards acquiring and completing Plot Quests or other quests that give adventurers as output, but are also of your lord’s bonus types.
Middle Game (round 4-6)
Primary Goals:
Stop worrying about Plot quests and start getting/completing quests that give adventurer output.
Use the engine you have built with Plot quests to your advantage.
Start acquiring quests that will give high VP output.
You should be transitioning away from acquiring Plot Quests and building buying so you can finish up creating your “engine” and getting it to peak efficiency. This part of the game is all about getting resources, getting quests of your type, and completing quests as quickly as possible.
End Game (round 7-8)
Primary Goals:
Determine your competition. You should know their lord’s identity based on the quest types they have completed.
Give mandatory quests to your primary competition, specifically in Round 8.
Focus on quests that give you huge VP output rather than adventurer output or Plot Quests.
Ideally, you should slide into the finish line with no adventurers in your Tavern, no Quests left to complete, no unused Intrigue card, and empty pockets. This means you didn’t waste action points on getting quests you could not complete or getting resources you couldn’t use. Obviously, you get some end game points for gold or adventurers left over, so it’s not the end of the world to have some of those to cap off your points, but they would be better used for quests.
Quests
This spreadsheet (waterdeep_stats) is a breakdown of all quest inputs and outputs. You’ll see that they are extremely well balanced between input and output so you’ll be able to get an edge over your opponents in one of these ways:
Your lord’s bonus.
The special bonuses you get as rewards.
Note in the spreadsheet that the only quest that has ridiculously good output compared to input is the Commerce quest for Thin the City Watch. Try to acquire that quest no matter your lord’s bonus quest types.
To take advantage of the first one, you will want to find the quests matching your lord’s bonus types with minimal input requirements and tend towards adventurer output rather than point output. This will help you complete more quests throughout the game and allow you to get a big bonus from your lord’s quest types at the end.
For the second one, you want to get engine-building bonuses in your early quests that will make you more efficient throughout the rest of the game. This might be an extra VP bonus for one of your two lord bonus quest types, extra resources when you take an action that provides one of your primary adventurers, or a building bonus.
Although high victory point quests generally have the best ratio of output to input, it is usually better to get as many low input quests of your lord’s types so you can cash in on that lord bonus as much as possible. Granted, many small quests will require more quest pick-up actions, but it is generally a better deal because of bonus rewards from them and the bonus you get from your lord.
Buildings
Buildings are another way to gain an advantage over your opponents. You want to buy buildings EARLY while keeping these three things in mind (at least one, but all, if possible):
Feature an action that allows you to take your primary adventurer types so you can use it to complete your quests.
Have an owner reward of something that will help you in case your opponents use it, whether it is your primary adventurer type, gold, or VP.
Keep buildings with actions that your opponents need for their quest types off the board.
You should put forth an extensive effort to buy buildings in the first 3 rounds, but after the 4th round, you can pretty much ignore them as the benefit you get from others using them will be greatly reduced. The primary exception is that there are some buildings (usually costing 8 gold) that will be particularly useful for completing your quest types that may even be worth buying later in the game so you can take advantage of easier access to those adventurer types. Another exception would be to pay the cost of the building to get the VP bonus that has accumulated from no one buying them.
A good building in the first round will get you 8 rewards (either from you using it or an opponent) for an investment of 3-8 gold. Those rewards will equate to a ton of resources and victory points throughout the game.
The less frequently discussed side of building purchasing is that if you can control Builder’s Hall, you control which buildings get out onto the board. You may want to buy less useful, cheaper buildings and take up the Builder’s Hall space to prevent an opponent from buying a building that will be particularly helpful in completing their quest types. In other words, controlling/occupying Builder’s Hall has advantages that go beyond strictly the output of the building you purchase. In short, controlling Builder’s Hall lets you control the game.
Intrigue Cards
Intrigue cards can help you improve your action/turn-advantage because you get a benefit from the card and then you get to reassign that agent to another action later in the round. You basically get 2 actions for the price of 1. Unless there is a very critical action space that you need on your turn before someone else gets it, use your action on intrigue cards whenever possible.
It may be hard to decide which Intrigue cards to use. It depends primarily on the number of players because many give advantages/disadvantages to a single opponent or multiple opponents. In a 2 player game, using an Intrigue card to take two adventurers while giving your opponent (100% of your opponents) one isn’t an amazing deal. In a 5 player game, getting two adventures and giving one of your opponents (25% of your opponents) one is a much better deal.
Mandatory Quest cards should obviously be played on the opponent in the best position. You usually want to save those for the final round so you can prevent them from completing a high-reward quest at the end of the game. Carefully analyze which opponent is doing the best and/or the number of actions they will have to take to gather the resources needed to complete the mandatory quest.
This is a strategy primer for Suburbia, by Ted Alspach. This only specifically covers the base game. Check out the video version immediately below or the text version that follows.
In Suburbia, your goal is to build up 3 locations to best play your investment markers. The game can be broken down into an Early Game, which is when you go through the A stack of tiles, the Middle Game, which is the B stack of tiles, and the Late Game is the C stack. You usually want to build up a good Income base in the early game, then switch over to a focus on Reputation in the middle game, then finish it off with getting Population any way you can in the late game.
High Level Strategies
The three high-level strategies I recommend are Residential (with Civic and Schools), Industrial (with Airports), and Commercial (with Condominiums). Choosing which one you use will depend almost completely on the goals you get because completing those goals will be extremely important when you’re calculating your final score. The only goal not worth achieving is the Fewest Investment Markers. Next, I will go through the 3 best strategies I have found, discussing the ideal borough layout for each one along with a walk-through of what you want from each stack.
Residential/Civic/Schools
First Investment Marker: Landfill, Farm, or Mint
Second Investment Marker: Stadium
Third Investment Marker: University or Museum
Critical Tiles: Casino, Stadium
Goals: Most Residential, Most Civic, Most Contiguous Civic, Least Income, Fewest Industrial, Highest Reputation, Most Lakes, Most Contiguous Lakes
Stack A: You will want a lake on each side of your Heavy Factory and Community Park. Start building a residential circle with any Homeowner’s Association tiles that appear. The Mint can also help give you a boost of 3 Income early and then $2 every time you build a new Civic building, which will help for all your schools. Although the money from the two lakes and possible Mint will help, you’ll still need to get either Industry or Commercial tiles to gain income, probably in the form of Fast Food Restaurant, Landfill, and/or Farm. You need to get some cash to buy some critical tiles that are coming up in stack B.
Stack B: You badly need the Stadium and the Casino in this one. A museum will be very nice as well. You are continuing to build your circle of residentials to go around the Stadium. You can also build a circle of civic tiles to go around a Museum. You will be grabbing any school you see, so you should have plenty of civic tiles. You can use Burg Von Alspach in the center of your residential circle if you are unable to get a Stadium.
Stack C: University, High School, and Middle School will be very nice additions to your borough, but others are decent too, like the Boutique and Bed & Breakfast. If you have been building schools, everyone will want that University tile when it drops, so make sure you can afford to grab it for $25, if needed.
Industrial/Airports
First Investment Marker: Municipal Airport
Second Investment Marker: Community Park
Third Investment Marker: Recycling Plant
Critical Tiles: Recycling Plant
Goals: Most Industrial, Most Airports, Fewest Lakes, Most Money, Most Reputation, Fewest Commercial, Fewest Residential
The airport part of the strategy is great because it gives you what you need when you need it. It gives you Income with the stack A airports, then adds Reputation in the stack B airports, and both in the stack C airports. Even if you don’t end up with 3+ airports by the end of the game, they will still help you, plus, other people buying them can help you as well, so you can benefit from them without even spending one of your turns on it. The Recycling Plant is extremely critical to this strategy as a source of Reputation.
Stack A: Municipal Airports are the most important in the A stack, but you can also grab Heavy Factory and Community Park. You can build an oval of Industrial for a future Recycling Center and Community Park. Go ahead and throw down an Investment Marker on the Municipal Airport right away so you can take advantage of its bonus throughout the whole game as it will keep growing with airports in every stack.
Stack B: Domestic Airports are the most important B tiles, but Power Station and Casino are also very good.The Recycling Plant is so critical to this strategy that you will want to make sure you have $27 saved up as soon as the first C tile hits the table so you can buy it immediately.
Stack C: You need the Recycling Plant. The PR Firm and International Airport are both exceptional as well. The Local EPA Office is decent, and the University will likely be very lucrative if someone else has been building schools.
Commercial
First Investment Marker: Community Park
Second Investment Marker: Office Building
Third Investment Marker: Condominium
Critical Tiles: PR Firm, Condominium
Goals: Most Commercial, Most Money, Most Income, Least Reputation, Fewest Civic, Fewest Industrial, Highest Income, Fewest Lakes
This one will get you started with some high Income tiles, build up a lot of cash, and then cap it off with Population boosters at the end. It’s hard to get a lot of Reputation in the end game with this strategy so, if you fall behind in Population, you won’t be able to easily catch up. Because of this, you will want to keep your Reputation above 0 by buying a Community Park and/or putting an early Investment Marker on your starting Community Park so you can make some steady progress in Population throughout the game. It is also possible to splash in some airports or even switch over to residential midway through if you can grab a Stadium since you will be building Condominiums and Apartments anyway.
You will want to choose once side of your starting tiles to build on and the other side will not be used, except for maybe utilizing the other edge of you starting Community Park or building Housing Projects. There are a lot of Commercial tiles that give you bonuses for adjacent Commercial tiles, so you’ll want to build a large oval instead of a small circle so you can clump more of your Commercial tiles together.
Stack A: Get Business Supply Stores and Office Buildings to start building your commercial oval. Feel free to create a lake on the side opposite your commercial oval because you’ll be able to use that as a barrier for Housing Projects later anyway. You can also put an Investment Marker on your starting Community Park and/or an Office Building.
Stack B: This is the only strategy where you can skip the Casino because you will have no money trouble and the negative 3 Reputation will hurt you too much, but the PR Firm will be extremely critical because Reputation will be hard to get. Your Income and cash options will allow you to buy it as soon as it drops. You can also get Housing Projects if you have a spot for it.
Stack C: You need that PR Firm because you will be greatly boosting your Population and will want to avoid hitting -5 Reputation. You will want to grab any Apartments and Condominium tiles that appear to go into your commercial oval. A Chip Fabrication Plant is nice, but they are expensive. You could also grab the University or International Airport tiles to get Reputation for another player’s airport or school-building efforts.
This is a strategy primer for the game Forbidden Desert, by Matt Leacock. Each time you sit down to play it, you have a monumental challenge in front of you, and if you are able to achieve victory, you have earned it. I will be covering a high-level strategy that I recommend and then a discussion on how to avoid each of the three losing conditions. Check out the video immediately below or the text version that follows it.
High-Level Strategies
The game can be separated into 3 phases, divided by the excavation of each well. I will call these Early, Game Middle Game, and Late Game.
Early Game
This phase involves splitting up the team to excavate in different directions while planning to end on the first well tile when water gets low. Hopefully someone finds a Terrascope so you can be sure everyone is heading to a well and not a mirage. Decide on one of the wells to be your first meeting spot right away and confirm it if you find a Terrascope. No one needs to excavate near the meeting point because everyone will be there soon to help with that.
Before you go, have first player excavate the helicopter spot and distribute the equipment where it makes sense, since you all begin on the same spot. For example, you wouldn’t want the Archeologist to have the Dune Blaster, or if it is a Jet Pack, it should go to the person with the most water so they can go to the furthest corner without worrying about making the return trip on foot.
Your goal is to excavate as much as you can while making it back to the meeting spot for the first well excavation. The number of turns you take before meeting depend on the difficulty level, the number of players, the canteen capacity of team members, tunnels found along the way, and how early Sun Beats Down cards are drawn. Each game will be different so stay within 4 squares of the meeting point after your first couple turns.
Middle Game
Everyone should all be back at the meeting point with at least 3 drinks of water to begin the middle game. Assume that you will need to excavate every tile before the end of the game and be happily surprised if you find everything earlier. With that in mind, decide on your next well meeting point and head to the places that still need to be excavated. Again, stay within 1 turn (usually 4 spaces) of that meeting point so you can run back to excavate the well if you run low on water, but if you can end your turns in tunnels, you may be able to skip this meeting point. But with the storm meter rising, if you are not able to end your turns in tunnels, you won’t have as much time before your canteen begins running dry, so do not stray too far from the meeting point unless you have a Jet Pack. If you find a Terrascope, you can use it to confirm the location of the last well to better plan for your meeting point.
End Game
Each game is so different that the game state during this phase need to be analyzed before deciding on how to finish your remaining objectives, but there is one key piece of advice I can offer. During this phase, at the beginning of each player’s turn, take a look at the 3 possible ways you can lose and assess your risk of them occurring. This will help you mitigate this risk and buy you as much time as possible. The next section will help with this task.
Risk Mitigation for Loss Conditions
The most important key to Forbidden Desert is improving your understanding of where you are compared to the 3 loss conditions. When you lose, note how you lose so you can work on preventing losing in that way in future games. You can run out of sand tiles, run out of water, or lose from the storm meter, and learning how to avoid them all is like learning how to juggle. It’s easy to avoid one of them, and even two isn’t that hard, but juggling all 3 is a formidable challenge. If you lose by running out of water, figure out how to use tunnels, water trading, and wells so that doesn’t happen anymore. Then you’ll start losing in another way, which is OK, because you can then start figuring out how to avoid that one.
Thirst
This is the most annoying way to lose because it can happen even if you play perfectly. You are only as hydrated as the person with your smallest canteen. Take note of who that is at the beginning of the game since they will determine how long you can go and how far you can travel before filling up. But if the 4 Sun Beats Down cards happen to be the first 4 in the deck when you start the game, you will lose immediately if you have someone on your team with a canteen capacity of 3. Because of these kinds of scenarios, you have to accept some risks concerning water.
The most important key to avoiding this loss condition is to use tunnels effectively. Those with the least water in their canteen should stay around the tunnels and end their turn there whenever possible. This is even more important with more players because ending a turn outside of a tunnel means you are exposed for more draws of the Storm Deck before you can move again.
If you get a Terrascope early in the game, you will use it on a well so you can better plan on where the wells are so you can stay loosely tethered to them. If you get a Jet Pack early, you can explore a far corner and still jet back to a well before it is excavated by your team.
Keep a close eye on how many of the 4 Sun Beats Down cards you have drawn and how many are left compared to the number of cards remaining in the Storm Deck. This will give you the percent chance of drawing one as you draw on each turn.
Buried
If you lose because you run out of sand tiles, you simply need to spend more action points on the Clearing Sand action. If you have an Archeologist on your team, make sure they know it is their primary responsibility to ensure the team does not lose because of this condition. Having this role will allow you to focus more on avoiding the other two loss conditions. If you do not have this role, each player will have to spend some of their action points on the Clear Sand action. It’s usually a very acceptable use of an action to clear sand on an unexcavated tile, even if you do not plan excavate it any time soon.
Swept Away
If you lose because of the Storm Meter, you are likely just not being as efficient as you need to be. You may be spending too many action points to end your turn in tunnels, not taking the shortest path between two points, or not taking advantage of each player’s role as frequently as you could be. If you can avoid the other two loss conditions, this one will just take experience to find ways to become more efficient.
Conclusion
Again, Mr. Leacock has created an extremely difficult challenge when he created this game for those playing on the Legendary difficulty, so losing is expected sometimes, even if you play perfectly. Improving your chances of winning is a logic puzzle that will likely take you MANY playthroughs before you feel like you have mastered it.
This is a strategy primer for the base game of Carcassonne. A lot of the ideas in this analysis relate to the expansions, but this article is focused on the base game to make it the most applicable to the majority of Carcassonne players. Check out the video version immediately below or the text version that follows.
The key to Carcassonne is being able to look at the game state and the tile you draw and decide whether to use it defensively, use it to collect short-term points, or use it for long-term-points. You want to reduce risk and maximize point expectations with thoughtful tile placement. The game does have a lot of luck involved in the tile drawing, so even the most elite Carcassonne player drawing too many road tiles can still lose to someone who just learned the rules and drew a bunch of monasteries.
High-Level Strategy
Below are three high-level strategies that you can utilize in a game of Carcassonne. I recommend against using a single strategy every time and expect to win consistently because you do not know which distribution of tiles you will draw. If you plan pre-game to go for one strategy, your tile drawing may not match it and you will likely lose miserably.
Small Cities (and Farming)
In this strategy, you keep to yourself, build a bunch of small cities for short-term points, and then place followers in nearby fields to farm long-term points for you. Road tiles are used to turn roads away from your corner of the board so they do not interfere with your cities or fields, and also used defensively to send them towards your opponents’ cities, fields, and monasteries. The small cities and roads will get you your followers back quickly so they can be used again and the field placements will allow you to cash in on the large number of small cities around the map as a source of long-term points.
Big Cities
This strategy is basically the opposite of the previous one. Here you work with your opponents to build massive cities and share the points. You will abandon field farming and hope large cities dominate the map so that those who choose to farm will not get many points from it. Basically, when you get a city tile, you put it next to an already-started large city with your follower in it or bridge one of your other cities into an existing city. When you do this, you can assume you will never get your follower back as those large cities tend to get out of control. It is also easy for someone to block its completion by building roads near it.
Opportunistic (Mix)
In the opportunistic strategy, you forget about pre-game strategies and just make the decision of where to go each time you draw a tile based on the current game state. It’s your best bet if you have a mind for game theory and can accurately weigh the utility of going for short-term points versus long-term point potential with each tile you draw. The other two strategies allow you to avoid having to weigh all of your options and just go heads-down in a direction that will score you a substantial number of points. As you play more Carcassonne, you will start drifting away from the others and settle mostly on this strategy.
Tile Placement
Each tile placement in Carcassonne is very critical, so take your time when deciding where to go. The more players you have in a game, the more it will be left up to the luck of the draw and the more liberal you can be in placing those followers in places where you will not get them back right away. In a 2 player game, you have 35.5 turns, 23.7 in a 3-player game, 17.75 in a 4-player game, and 14.2 for a 5-player game. You can see the Turn Advantage column below that shows which players get to take an extra turn.
Monasteries
Monasteries are BY FAR the best tile you can get in the game. It gets you a significant number of points, it’s fairly easy to complete to get your follower back, and you can build cities and roads next to it to double-dip on points. If you get a monastery early game, always place your follower on it, but if it is very late in the game, you may find it more effective to put your follower on the field spot to get points from completed cities near it or by using it without a follower to extend the field of one of your existing farmers. These are the main reason you need to always have a spare follower in your pool because, if you draw one of these and you are out of followers, you will miss out on a lot of points.
With monasteries, let your opponents help you complete them. You can’t realistically spend 9 turns placing tiles around it, but if you put it next to cities, roads, and monasteries in which your opponents have already invested, they will complete much of it for you. You can encourage their help by putting long, open roads or unclaimed cities that may be too juicy for them to pass up, even if it means giving you points.
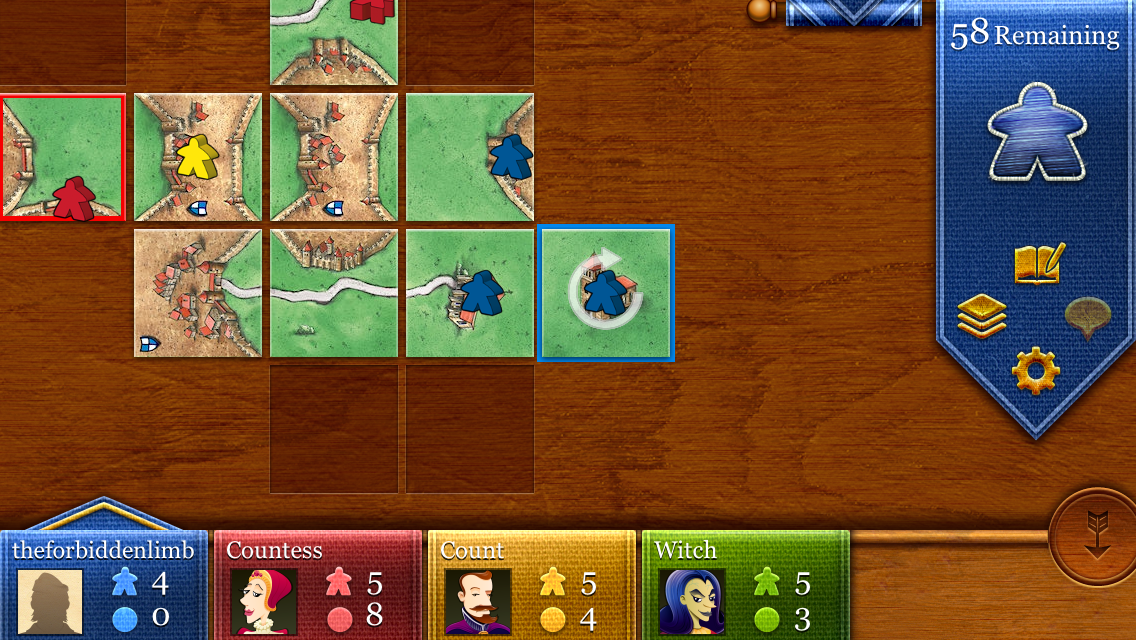
Roads
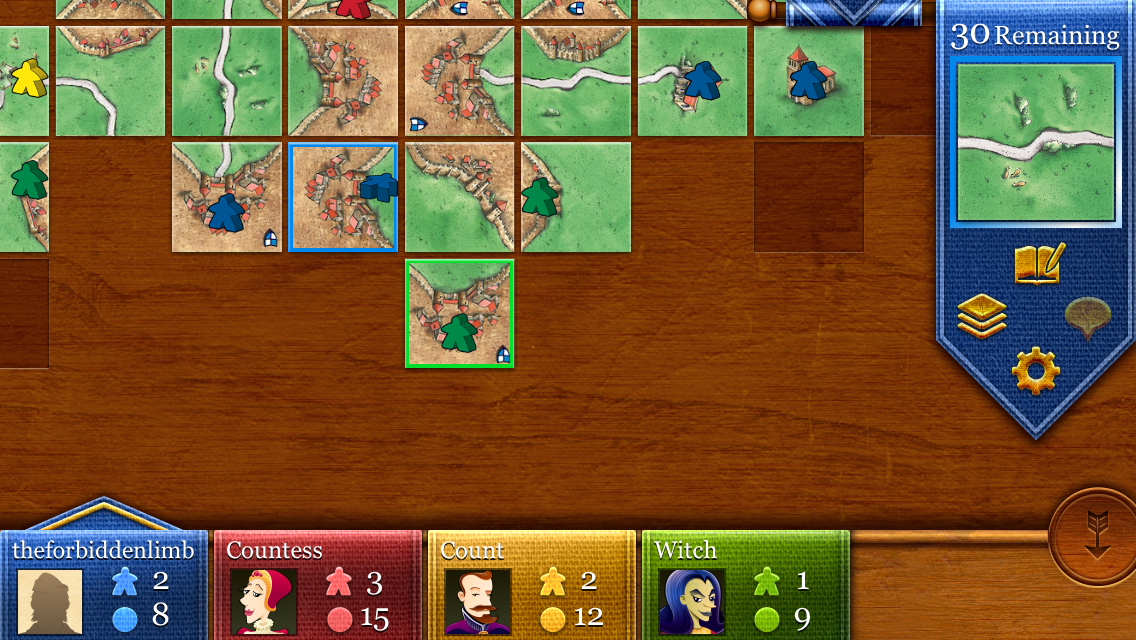
It’s always sad when you draw a road because they won’t score you many points and placing followers on it still run the risk of them getting stranded, but they are the most effective way to block your opponents by using them defensively. It is extremely valuable to block them by preventing them from completing a road, city, or monastery through creating a set of sides that will not appear in the remaining draw tiles. It will greatly diminish their ability to score points throughout the rest of the game and improve your relative standing. For example, in the image below, the road/city tile green placed kept my blue monk from completing his monastery and stranded my blue thief on the road. One tile severely hindered my ability to score points throughout the rest of the game.
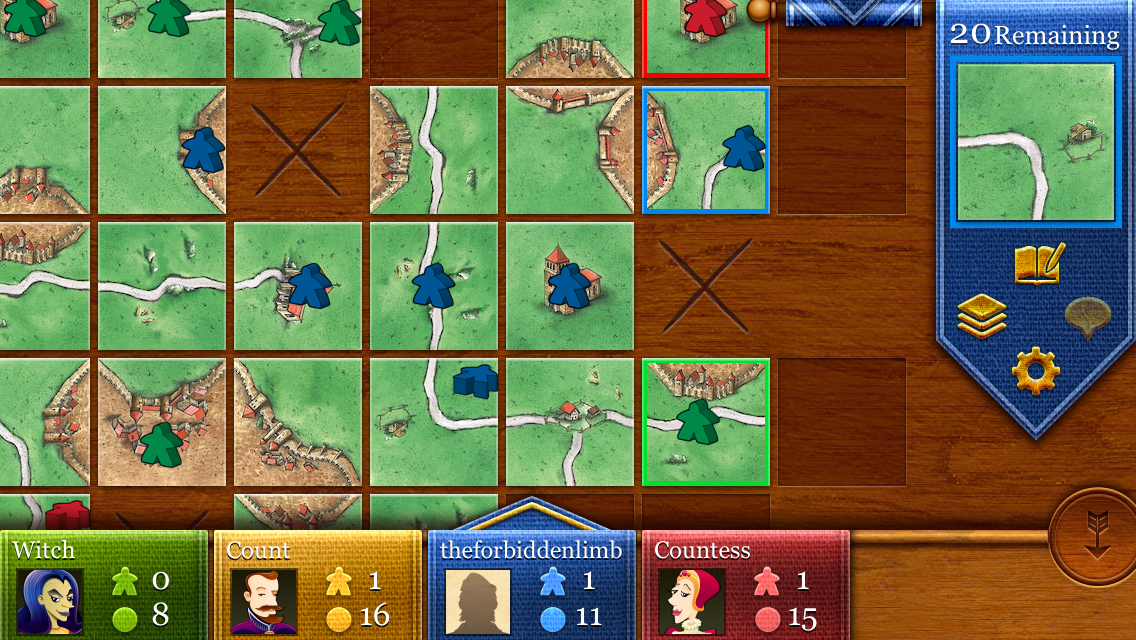
Fields
If you are going for fields, be very careful with your mid and end game placements because it is very easy to connect fields to opponent farmers that can lose the majority for you or give a bunch of points to an opponent. Farmer placement in the end game is an art form and your skill in this will improve over time. Do not get obsessed with farmers early in the game, especially in a game with fewer players, because they are a huge investment in forever stranding them and you need your followers to stretch over more turns the fewer players there are in the game.
Cities
The biggest city you want is 5 tiles if you hope to complete it, otherwise, assume you will not be getting it back for the rest of the game and chalk it up as a long-term investment. When you see an open city “cap” piece on the board and you draw another one, you almost always want to complete it as a 2-tile city with your follower inside to grab a quick 4 points that has no risk of stranding a follower.
General Tactics
Try to always be working on a single road and a single city so you can make use of each of those types of pieces. Do not attempt to work on two of either of them because others will likely steal points from you or block you on one if you split your attention and that will result in stranded followers.
Don’t use your last follower until your final turn. There are exceptions here, like if you draw a monastery or you can put a follower in a field that you expect to get you 20 points, but make sure you have a few “outs” to get followers back into your pool in the very near future if you empty your pool. Part of this is playing a game where you aren’t stranding your followers everywhere and instead you are focusing on completing roads, cities, and monasteries to get them back and re-use them.
Always have a rival in mind that you determine to be your biggest threat, which you will try to thwart when you get a chance. This rival may change (and probably will) throughout the game. For those who are not doing well point-wise, you can avoid wasting your energy complicating their game and just focus on scoring your own points.
Success in Coup depends on the cold, hard skills of probability and deduction along with the fluffy, social skills of deceiving and lie detection. It’s about choosing which roles to pretend to be while challenging at the right time. To keep this short, I will mostly stay away from talking about the social skills and focus on the math. Check out the video immediately below or continue on for the text version.
Strategy Progression
Unlike most games, there isn’t much of a middle game because games of Coup are so short. I am characterizing high-level strategy in terms of Early Game and Late Game. Overall, you can feel free to claim to be anyone you wish in the early game because the only people who will likely challenge you are those with a pair of the character you are claiming. Once you get into the late game, players have much more information about the characters remaining, so you need to be careful about making false claims about your character.
Early Game
In the early game, you want to be the Duke so you can gain the coin advantage. The Assassin can be nice to knock opponents down in influence early and the Contessa can help to block early assassination attempts as well. If you are none of these, you may want to take the Ambassador action and exchange your cards with the Court Deck.
Do not take foreign aid in the early game. There will likely be many others claiming to be the Duke and taking 3 coins so it will not be much of a risk to also claim to be the Duke to block your foreign aid.
In your first few turns, pretend to be the Duke, even if you are not. Getting 3 coins per turn will be extremely helpful later in the game. It will not be worth it for your opponents to challenge you unless you do it every single time. It does make you a bit of a target if you have more coins than anyone else, so do not be afraid to use them early to assassinate someone.
Late Game
The best late game character is the Captain to steal and block others’ stealing and control the cash flow. The Contessa can also be nice if someone attempts to assassinate you and the Assassin can be good for a final assassination for 3 coins instead of 7. If you are not one of these after the first player is exiled, you may want to take the Ambassador action to exchange cards with the Court Deck.
Once you get into the late game when there are 1-2 opponents remaining, taking foreign aid can force others to give you information or allow you to get 2 coins each turn. 2 coins and information may be more valuable late game than getting 3 coins with the Duke.
Stealing with the Captain gets to be far more valuable in the late game as your number of opponents decreases. If you have a single opponent, taking 2 coins from them means +2 for you and -2 for them, resulting in a 4 coin swing in your favor, and likely securing an uncontested Coup in a matter of turns.
If you and an opponent each have 1 influence, it comes down to who will be able to get up to 7 coins first. You usually have three options here: steal with the Captain, tax with the Duke, or assassinate with the Assassin. If you do not have any of these characters, you better start faking it as the Captain or the Duke until you have the coin advantage or you will lose.
Challenging
After you play a bit with the same group, you will run into a situation where someone always says they are the Duke. Should you challenge them? Well, maybe you have a good read on them and can tell when they’re lying, but let me explain the odds. When you are given your initial hand, you have seen two of the fifteen cards. If none of them are the Duke, the chances that this opponent’s Duke claim is honest is 6/13 = 46.15%. I don’t know about you, but I wouldn’t want to bet my influence on almost a flip of a coin. BUT, if you have a Duke card in your hand, the chances that they are also the Duke falls to 4/13 = 30.77%. This becomes more reasonable to challenge them on it. If you have a pair of Dukes, it drops to 15.38%.
As the game progresses past the initial hand, you’re on your own. There are only 15 cards in the whole Court Deck, so you can do some quick probability calculations every time someone takes a character action to get a feel for the likelihood that they are telling the truth. Use that, along with past character actions and any tells they may have to help make your final decision about when to challenge.
Assassinations
If you have 2 influence, NEVER:
Falsely claim to be the Contessa when you are being assassinated.
Challenge an Assassin who is assassinating you. (unless you have perfect information that they are not the assassin)
If you are wrong about either of these two, you are exiled. You will be ridiculed and then left to sadly sit and watch the rest of the game with an embarrassed look on your face. It’s far better to just accept the assassination and live to fight another day.
A corollary to this is that you can pretend to be an assassin and assassinate someone with 2 influence and your opponent is less likely to challenge it.
General Tactics
Use pairs to your advantage. When your opponents claim to be a particular character, they do not expect someone to have 2 of them, so this is a good time to challenge them. Just keep in mind that there are only 15 cards in the deck so there is still a good chance they have the other character card unless it is already face-up. Also, if someone is closely watching your claims, you can try to trick them by continuing to claim you are someone even after you lose an influence, especially if you make it look like you acted very quickly and possibly overlooked the fact that you lost that character when you lost your influence. If you do not see any opportunities to use your pairs to your advantage, you may want to use the Ambassador action so you can get two different characters.
It is very unlikely someone will challenge whether you are the Ambassador because it doesn’t immediately hurt them and is not guaranteed to help you, so feel free to falsely use this action if you do not like your current hand.
Once player A steals from player B using the Captain and player B allows it, anyone else can safely steal from player B. This means that you need to be careful when you allow anyone to steal from you because others may pile on and it means you should feel free to get in on that action if someone else allows it.
After you have played with the same group for a few games and they improve their bluffing skills, you will want to begin making most of your decisions on perfect information, or at least deducing which information is highly likely to be correct based on the face up cards, the cards in your hand, and their past claims. People get harder to read with practice.