Carcassonne Strategy Primer

This is a strategy primer for the base game of Carcassonne. A lot of the ideas in this analysis relate to the expansions, but this article is focused on the base game to make it the most applicable to the majority of Carcassonne players. Check out the video version immediately below or the text version that follows.

The key to Carcassonne is being able to look at the game state and the tile you draw and decide whether to use it defensively, use it to collect short-term points, or use it for long-term-points. You want to reduce risk and maximize point expectations with thoughtful tile placement. The game does have a lot of luck involved in the tile drawing, so even the most elite Carcassonne player drawing too many road tiles can still lose to someone who just learned the rules and drew a bunch of monasteries.

High-Level Strategy

Below are three high-level strategies that you can utilize in a game of Carcassonne. I recommend against using a single strategy every time and expect to win consistently because you do not know which distribution of tiles you will draw. If you plan pre-game to go for one strategy, your tile drawing may not match it and you will likely lose miserably.

Small Cities (and Farming)

In this strategy, you keep to yourself, build a bunch of small cities for short-term points, and then place followers in nearby fields to farm long-term points for you. Road tiles are used to turn roads away from your corner of the board so they do not interfere with your cities or fields, and also used defensively to send them towards your opponents’ cities, fields, and monasteries. The small cities and roads will get you your followers back quickly so they can be used again and the field placements will allow you to cash in on the large number of small cities around the map as a source of long-term points.

Big Cities

This strategy is basically the opposite of the previous one. Here you work with your opponents to build massive cities and share the points. You will abandon field farming and hope large cities dominate the map so that those who choose to farm will not get many points from it. Basically, when you get a city tile, you put it next to an already-started large city with your follower in it or bridge one of your other cities into an existing city. When you do this, you can assume you will never get your follower back as those large cities tend to get out of control. It is also easy for someone to block its completion by building roads near it.

Opportunistic (Mix)

In the opportunistic strategy, you forget about pre-game strategies and just make the decision of where to go each time you draw a tile based on the current game state. It’s your best bet if you have a mind for game theory and can accurately weigh the utility of going for short-term points versus long-term point potential with each tile you draw. The other two strategies allow you to avoid having to weigh all of your options and just go heads-down in a direction that will score you a substantial number of points. As you play more Carcassonne, you will start drifting away from the others and settle mostly on this strategy.

Tile Placement

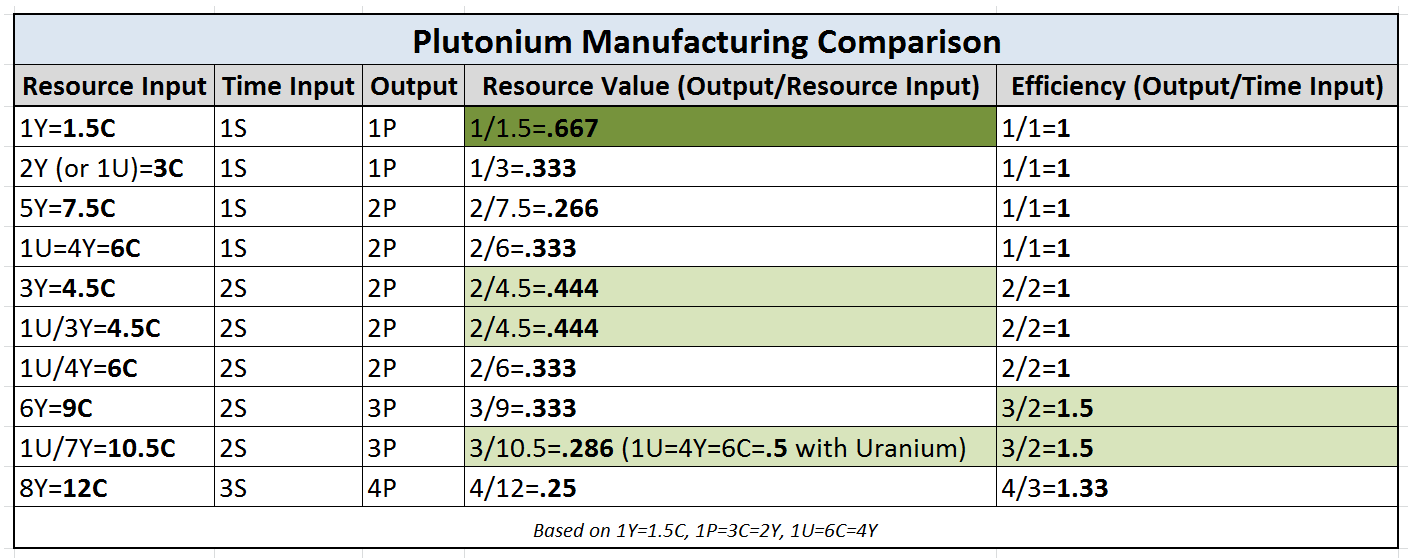
Each tile placement in Carcassonne is very critical, so take your time when deciding where to go. The more players you have in a game, the more it will be left up to the luck of the draw and the more liberal you can be in placing those followers in places where you will not get them back right away. In a 2 player game, you have 35.5 turns, 23.7 in a 3-player game, 17.75 in a 4-player game, and 14.2 for a 5-player game. You can see the Turn Advantage column below that shows which players get to take an extra turn.

player_table

Monasteries

Monasteries are BY FAR the best tile you can get in the game. It gets you a significant number of points, it’s fairly easy to complete to get your follower back, and you can build cities and roads next to it to double-dip on points. If you get a monastery early game, always place your follower on it, but if it is very late in the game, you may find it more effective to put your follower on the field spot to get points from completed cities near it or by using it without a follower to extend the field of one of your existing farmers. These are the main reason you need to always have a spare follower in your pool because, if you draw one of these and you are out of followers, you will miss out on a lot of points.

With monasteries, let your opponents help you complete them. You can’t realistically spend 9 turns placing tiles around it, but if you put it next to cities, roads, and monasteries in which your opponents have already invested, they will complete much of it for you. You can encourage their help by putting long, open roads or unclaimed cities that may be too juicy for them to pass up, even if it means giving you points.

Roads

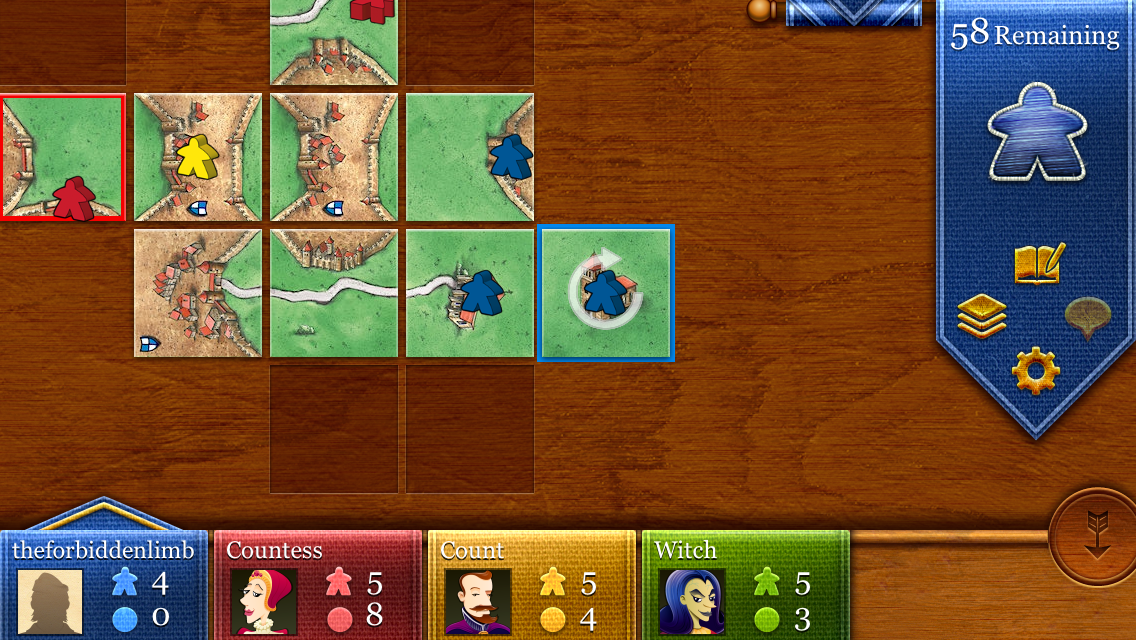
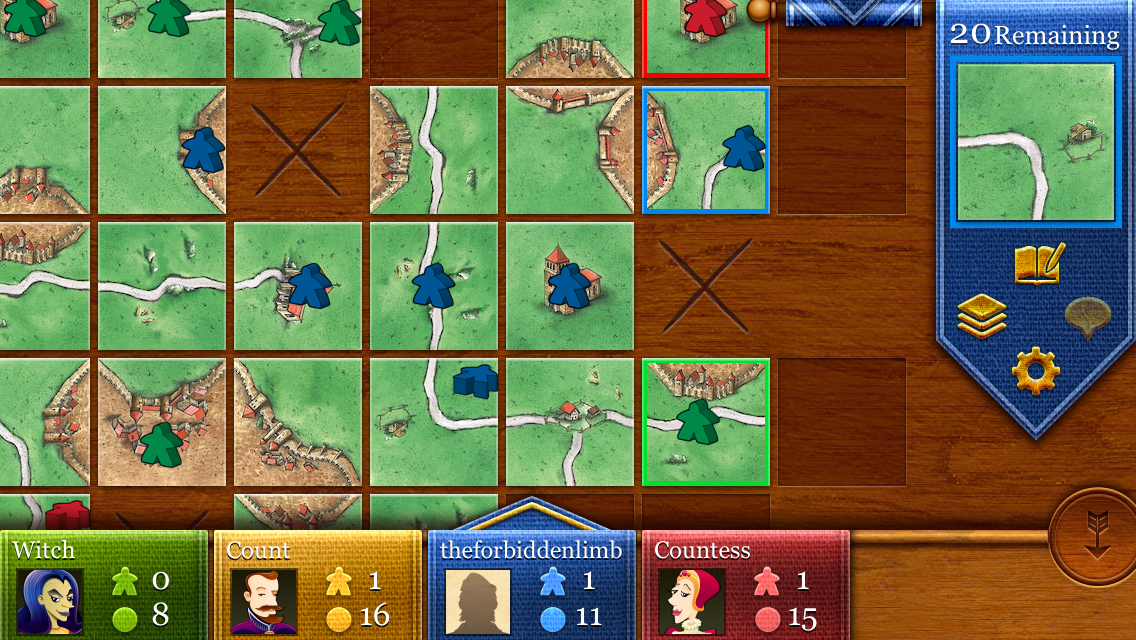
It’s always sad when you draw a road because they won’t score you many points and placing followers on it still run the risk of them getting stranded, but they are the most effective way to block your opponents by using them defensively. It is extremely valuable to block them by preventing them from completing a road, city, or monastery through creating a set of sides that will not appear in the remaining draw tiles. It will greatly diminish their ability to score points throughout the rest of the game and improve your relative standing. For example, in the image below, the road/city tile green placed kept my blue monk from completing his monastery and stranded my blue thief on the road. One tile severely hindered my ability to score points throughout the rest of the game.

Fields

If you are going for fields, be very careful with your mid and end game placements because it is very easy to connect fields to opponent farmers that can lose the majority for you or give a bunch of points to an opponent. Farmer placement in the end game is an art form and your skill in this will improve over time. Do not get obsessed with farmers early in the game, especially in a game with fewer players, because they are a huge investment in forever stranding them and you need your followers to stretch over more turns the fewer players there are in the game.

Cities

The biggest city you want is 5 tiles if you hope to complete it, otherwise, assume you will not be getting it back for the rest of the game and chalk it up as a long-term investment. When you see an open city “cap” piece on the board and you draw another one, you almost always want to complete it as a 2-tile city with your follower inside to grab a quick 4 points that has no risk of stranding a follower.

General Tactics

Try to always be working on a single road and a single city so you can make use of each of those types of pieces. Do not attempt to work on two of either of them because others will likely steal points from you or block you on one if you split your attention and that will result in stranded followers.

Don’t use your last follower until your final turn. There are exceptions here, like if you draw a monastery or you can put a follower in a field that you expect to get you 20 points, but make sure you have a few “outs” to get followers back into your pool in the very near future if you empty your pool. Part of this is playing a game where you aren’t stranding your followers everywhere and instead you are focusing on completing roads, cities, and monasteries to get them back and re-use them.

Always have a rival in mind that you determine to be your biggest threat, which you will try to thwart when you get a chance. This rival may change (and probably will) throughout the game. For those who are not doing well point-wise, you can avoid wasting your energy complicating their game and just focus on scoring your own points.

Coup Strategy Primer

Success in Coup depends on the cold, hard skills of probability and deduction along with the fluffy, social skills of deceiving and lie detection. It’s about choosing which roles to pretend to be while challenging at the right time. To keep this short, I will mostly stay away from talking about the social skills and focus on the math. Check out the video immediately below or continue on for the text version.

Strategy Progression

Unlike most games, there isn’t much of a middle game because games of Coup are so short. I am characterizing high-level strategy in terms of Early Game and Late Game. Overall, you can feel free to claim to be anyone you wish in the early game because the only people who will likely challenge you are those with a pair of the character you are claiming. Once you get into the late game, players have much more information about the characters remaining, so you need to be careful about making false claims about your character.

Early Game

In the early game, you want to be the Duke so you can gain the coin advantage. The Assassin can be nice to knock opponents down in influence early and the Contessa can help to block early assassination attempts as well. If you are none of these, you may want to take the Ambassador action and exchange your cards with the Court Deck.

Do not take foreign aid in the early game. There will likely be many others claiming to be the Duke and taking 3 coins so it will not be much of a risk to also claim to be the Duke to block your foreign aid.

In your first few turns, pretend to be the Duke, even if you are not. Getting 3 coins per turn will be extremely helpful later in the game. It will not be worth it for your opponents to challenge you unless you do it every single time. It does make you a bit of a target if you have more coins than anyone else, so do not be afraid to use them early to assassinate someone.

Late Game

The best late game character is the Captain to steal and block others’ stealing and control the cash flow. The Contessa can also be nice if someone attempts to assassinate you and the Assassin can be good for a final assassination for 3 coins instead of 7. If you are not one of these after the first player is exiled, you may want to take the Ambassador action to exchange cards with the Court Deck.

Once you get into the late game when there are 1-2 opponents remaining, taking foreign aid can force others to give you information or allow you to get 2 coins each turn. 2 coins and information may be more valuable late game than getting 3 coins with the Duke.

Stealing with the Captain gets to be far more valuable in the late game as your number of opponents decreases. If you have a single opponent, taking 2 coins from them means +2 for you and -2 for them, resulting in a 4 coin swing in your favor, and likely securing an uncontested Coup in a matter of turns.

If you and an opponent each have 1 influence, it comes down to who will be able to get up to 7 coins first. You usually have three options here: steal with the Captain, tax with the Duke, or assassinate with the Assassin. If you do not have any of these characters, you better start faking it as the Captain or the Duke until you have the coin advantage or you will lose.

Challenging

After you play a bit with the same group, you will run into a situation where someone always says they are the Duke. Should you challenge them? Well, maybe you have a good read on them and can tell when they’re lying, but let me explain the odds. When you are given your initial hand, you have seen two of the fifteen cards. If none of them are the Duke, the chances that this opponent’s Duke claim is honest is 6/13 = 46.15%.  I don’t know about you, but I wouldn’t want to bet my influence on almost a flip of a coin. BUT, if you have a Duke card in your hand, the chances that they are also the Duke falls to 4/13 = 30.77%. This becomes more reasonable to challenge them on it. If you have a pair of Dukes, it drops to 15.38%.

As the game progresses past the initial hand, you’re on your own. There are only 15 cards in the whole Court Deck, so you can do some quick probability calculations every time someone takes a character action to get a feel for the likelihood that they are telling the truth. Use that, along with past character actions and any tells they may have to help make your final decision about when to challenge.

Assassinations

If you have 2 influence, NEVER:

  • Falsely claim to be the Contessa when you are being assassinated.

  • Challenge an Assassin who is assassinating you. (unless you have perfect information that they are not the assassin)

If you are wrong about either of these two, you are exiled. You will be ridiculed and then left to sadly sit and watch the rest of the game with an embarrassed look on your face. It’s far better to just accept the assassination and live to fight another day.

A corollary to this is that you can pretend to be an assassin and assassinate someone with 2 influence and your opponent is less likely to challenge it.

General Tactics

Use pairs to your advantage. When your opponents claim to be a particular character, they do not expect someone to have 2 of them, so this is a good time to challenge them. Just keep in mind that there are only 15 cards in the deck so there is still a good chance they have the other character card unless it is already face-up. Also, if someone is closely watching your claims, you can try to trick them by continuing to claim you are someone even after you lose an influence, especially if you make it look like you acted very quickly and possibly overlooked the fact that you lost that character when you lost your influence. If you do not see any opportunities to use your pairs to your advantage, you may want to use the Ambassador action so you can get two different characters.

It is very unlikely someone will challenge whether you are the Ambassador because it doesn’t immediately hurt them and is not guaranteed to help you, so feel free to falsely use this action if you do not like your current hand.

Once player A steals from player B using the Captain and player B allows it, anyone else can safely steal from player B. This means that you need to be careful when you allow anyone to steal from you because others may pile on and it means you should feel free to get in on that action if someone else allows it.

After you have played with the same group for a few games and they improve their bluffing skills, you will want to begin making most of your decisions on perfect information, or at least deducing which information is highly likely to be correct based on the face up cards, the cards in your hand, and their past claims. People get harder to read with practice.

The Manhattan Project Strategy Primer

The Manhattan Project is an awesome worker-placement game that appeals to a very wide audience. Hard-core gamers will be fairly challenged to build their bomb-production engine faster than their opponents while others will find it to be a very easy-to-use gateway, worker-placement experience. The theme is beautifully woven into the gameplay and the graphic design makes the moderately complex decisions seem simple. This analysis is focused on the base game, but most of this applies to the expansions as well. Supplemental data used during this analysis can be found here: manhattan_project_data. Also, you can check out the video version immediately below or the text version that follows it.

High-Level Strategies

The three possible high-level strategies are:

·         Go for Plutonium – cheap and quick, but lower points mean more bombs are needed… this may involve testing a bomb first.

·         Go for Uranium – expensive (requires coins as input) and slow to produce, but higher points on bombs means fewer are needed.

·         Mix and Match – this requires more micromanagement and effectively requires both a Reactor and Enrichment Plant in your building menagerie.

Each strategy is quite viable where the best one for you in a particular game depends on the bomb designs you are able to acquire, the buildings you are able to construct, and the number of players in the game since more players means the fewer the points you need to win. Going the plutonium route along with testing a small bomb first is usually the best plan, especially with fewer players (because more points are needed for winning), but if you are able to acquire 2 uranium designs that add up to the points you need to win, that will be the quickest and easiest path to victory. Plutonium is twice as easy to produce and doesn’t require coins as an input for the Reactors like every uranium Enrichment Plant does. Plutonium bombs do not require twice as much plutonium for the same point value, so if you are able to construct buildings with plutonium output and grab plutonium bomb designs, go heads-down plutonium and don’t look back.

Strategy Progression

Early Game

Your focus right away is on training your workers and constructing buildings. All of your workers should go onto either the scientist University, engineer University, or Construction spots for the first few turns. You need to get yourself up to a full workforce expeditiously so you can optimize your efficiency for the rest of the game. Buying University buildings is extremely fruitful on your first few turns if they are affordable. You will also need an early Mine or two, and if you can grab a Factory that has an output of coins, it will serve you extremely well throughout the game. If you cannot use all of your workers on your turn, you know that you need to build more buildings, and if you have vacant buildings at the end of your turn, you know you need to recruit a larger workforce.

Mid Game

Next, your focus turns towards manufacturing yellowcake in your mines, getting a reactor/plant for plutonium or uranium, and placing on the bomb design board space. This will get you a goal to work towards and get you two bomb designs to use for your planning. More designs will come from opponents designing bombs where the designs you choose depend on whether you can produce uranium or plutonium. Continue constructing buildings when you see Factories with coin output, Mines, or your type of Reactor/Plant comes up so you can utilize your entire workforce every other turn. Ideally, you are placing your entire workforce on your buildings one turn, then recalling them all on the next. Occassionally you have to place two turns in a row before you recall because there is a valuable spot open on the board like Espionage or a University you need, but try not to make that a habit.

End Game

Now you are fairly locked into your high-level strategy and will have to keep an eye out for another Reactor/Plant that produces your needed resource type and be ready to buy it at a high price before someone else snatches it up. You want 2-3 Mines plus 2-3 sources of plutonium and/or uranium on your buildings in the early part of the end game to churn out that bomb material like mad. This is where it is particularly important to not lose focus on what matters: getting the points you need to win the game. Don’t worry about building planes, doing airstrikes, and making materials that are not required for the bombs you need to win. If you do not need anymore yellowcake for your last bombs, don’t bother making it.

Building Valuation

The effectiveness of each type of building differs greatly in this game, so you can give yourself a significant edge by choosing the more efficient producers over the less efficient, but do not over-think it because, if you need yellowcake, just grab a Mine, even if it isn’t the best one you’ve ever seen. Note that I am not taking into account the worker/time investment required for each, although you should consider it when you make your building selections to ensure you have enough workers to match its input needs. For purposes of evaluating resource input compared to output, we will use coins as the common denominator, where the value of each resource is shown below.

resource_values_cropped

This was determined based on an average cost of resources in each way they can be acquired. Again more details can be found here: manhattan_project_data

Mines

Below is a list of each mine with its input, output, and value. You can see that there is one ultimate Mine, where a single engineer can produce 3 yellowcake! The other Mines with a value of 3 are also very good, so keep an eye out for all of them and happily pay a premium for them if they appear on the building market.

mines_data

Plutonium Reactors

As you can see below, just like with the Mines, there is a standout plutonium Reactor where 1 scientist and 1 yellowcake gets you 1 plutonium. If you can get that in the early game, you have no excuse for not being victorious. The 1 uranium for 3 plutonium Reactor is an excellent deal as well, but requires that you have a source of uranium. You don’t want to waste your board placements on uranium or plutonium if you can help it, but that conversion ratio may make it worth your while if you grab that building. Keep an eye out for the other two with resource values of .444 as they are very nice as well.

plutonium_data2_cropped

Uranium Enrichment Plant

Uranium Enrichment Plants are similar to Mines and Reactors in that there is one exceptional prospect in the bunch, this one being the 5 coins and 2 yellowcake for 2 uranium. The .235 and .22 resource value Plants are worth having on your radar too in case they come up on the market.

uranium_manufacturing2_cropped

Universities

These are very good in the early game and steadily go down in value as your workforce expands throughout the game. Even in the late game, it’s nice to convert a standard worker for a contractor that is a scientist or engineer to help with your more worker-expensive buildings and bombs. You should get at least one of these in the early game, even if you have to spend a little extra on the building market for them.

Factories

These are only useful when their output is money, but that is extremely good. The one with the engineer as input and 5 coins as output is one of those ultimate buildings that you should buy almost no matter the price on the market.

General Tactics

Long-term benefit is better than short-term benefit in the early and mid-game. You want to train workers and construct buildings, even though you may feel your opponents are getting out to a big lead. This is just fine because you don’t want to be a target anyway. Having a full workforce and a wide array of buildings on your mat will be far more beneficial. Only place on the main board Mine, Reactor, or Enrichment Plants in the end game to get your final points to win, otherwise try to stick to your own buildlings for these resources.

Focus on the goals that matter and do not be distracted by everything else! You will be tempted to build fighters, bombers, go on assaults, or place on board locations that only give you short-term benefit instead of constructing buildings and training workers for long-term benefit, but you must resist. Just know the points you need to win, acquire designs that will get you to those points, and then focus entirely on getting the resources you need to build those bombs. When calculating your point needs, add 5 points for each bomb you plan to build because you will almost always load them… also, do not forget about the bonus points you get for testing if you plan to test a bomb. If you can find a small bomb to test, it’s often well worth it.

Do not just build bombs whenever you can because bombs on the table mean you become a target. If you can get 2 big bombs, try to save up all resources required to build them and load them so you can throw them down at once, or in close proximity. Of course, if your bombs require too many workers to build to get you to the victory total, build a smaller one but don’t load it before doing a late game recall so it’s on the table and you can use your fresh set of workers to build your final bomb(s). You might as well only load your bombs at the very end so you are less of a target and you can use the bombers to threaten players even though you know you would never waste them in a bombing run, although that does come with the slight risk that someone will shoot down your bombers with their fighters before you can load your bombs, so be careful.

Stay away from fighters, bombers, and air strikes. They waste resources and time that you need to be the first to build the bombs required to win. Only build enough bombers so you can load each of the bombs you plan to build and do not build any fighters unless your opponents are very aggressive. If you get bombed, it’s OK, just repair. That time and money will be cheaper than building up an airforce and wasting time using it.

Use espionage whenever it is available. Espionage is amazing. You get the benefit of your opponents’ buildings while significantly reducing their ability to manufacture resources. You’re going to place your workers on your own buildings anyway so why not place them on opponents buildings first and choke up their capabilities while freeing up your own buildings? This is one time where delaying your recall and placing multiple turns in a row may be worth it to leave your workers on opponent buildings or valuable board spots so others cannot use them.

Money is very powerful in this game. Before taking money from the factory board spaces, check to see if there is anything in the bribe pile because that is frequently overlooked.

Know who the leader is in the game, if it is not you. Try to get others to team up against them, hopefully by using few/none of your resources to do it. When using espionage, try to use their buildings first to slow them down.

Words with Friends (and Scrabble) Strategy Primer

This is a strategy guide for the game Words with Friends. It is based on the basic game, 2-player game, but much of what this contains can be used in 3-4 player games, other variants, or in Scrabble. Keep reading the detailed text version below or view the brief video version that immediately follows this sentence.

The biggest misconception Words with Friends players have is thinking that the best players are the ones who make the biggest words or have the largest vocabulary. That is extremely inaccurate. The most important keys are:

  • Know all the 2 letter words. They are:
    AA, AB, AD, AE, AG, AH, AI, AL, AM, AN, AR, AS, AT, AW, AX, AY, BA, BE, BI, BO, BY, DA, DE, DI, DO, ED, EF, EH, EL, EM, EN, ER, ES, ET, EX, FA, FE, FI, GI, GO, HA, HE, HI, HM, NO, ID, IF, IN IS, IT, JO, KA, KI, LA, LI, LO, MA, ME, MI, MM, MO, MU, MY, NA, NE, NO, NU, OF, OE, OF, OH, OI, OM, ON, OP, OR, OS, OW, OX, OY, PA, PE, PI, QI, RE, SH, SI, SO, TA, TI, TO, UH, UM, UN, UP, US, UT, WE, WO, XI, XU, YA, YE, YO, ZA
    (Note that V and C are not included here, which makes them excellent blockers to prevent opponents from playing two letter words in order to stretch over to a Triple Word Score.)
  • Play defensively. This is EQUALLY important as playing offensively. If you say to yourself, “I’ll play here and just hope my opponent doesn’t have a (something),” abort that plan and find another place to play.
  • Recognize prefixes and suffixes. Realizing you have something like “ing” or “tion” is far more important than having a large vocabulary.
  • Understand the value of your play options in a very basic way. See the Playing Words section below.

Playing Tiles

Step One: What are the best spots on the board? In order of average value:

  1. Triple word scores. This is by far the most valuable tile, making even a simple word into a decent score.
  2. Triple/double letters next to vowels. This allows you to play a larger point letter on it perpendicular to the vowel so you can score it twice, along with the double/triple bonus.
  3. Playing on top of or next to a block that will give you multiple words. This is commonly used to get rid of low-point letters, especially vowels. A strong knowledge of three-letter words helps tremendously in this endeavor.
  4. Double word scores. These can add up to serious points, especially in conjunction with a double/triple letter score. Be careful not to leave your opponent with a high-potential place to play when using them though.
  5. Adding a letter on to the end of an existing word. If you can play a word that adds a single letter onto an existing word to make a second new word, you can score a decent number of points from the existing word. Since you do not get bonuses for the existing word, this type of play is not one of the most valuable options, but still better than only getting points for a single word.

Step Two: What will this play leave for my opponent?

The potential point opportunity for your opponent is of almost equal importance as how many points it will get for you, especially when you are playing a WWF player of advanced skill. When deciding on the word to play, take into account both your word score and your opponent’s scoring potential given the state of the board you leave for their turn. Pretty much never leave them with access to a Triple Word Score or a Triple/Double Letter Score next to a vowel.

Tray Management

When you’re looking for words to play, try to identify parts of words that are commonly used. What you want:

  • Things like ing, ed, er, ite, ide, ine, tion, etc. You can string these together to form words that use all 7 tiles or just stretch a long word over to a Triple Word Score. If nothing else, organizing the tiles in your tray so these letter combinations are together help visualize the words you can form.
  • A roughly 35%/65% distribution of vowels/consonants. No one likes to have mostly/all vowels or mostly/all consonants and the naïve WWF player will tell you it’s all luck of the draw. It’s really not. It is worth using a slightly less valuable word to leave yourself with a better balance of consonants and vowels for next turn. For example, leaving yourself with TIAE is way better than leaving yourself with IIAE, even if it means a few less points.
  • Avoid repeating letters. I would MUCH rather have an A and an E left for next turn than two As. It’s not as bad to have OO or EE because they frequently show up together, but II or AA is terrible.

Part of your tray composition is luck, but you are often faced with fairly even scoring word options, where you may be able to lose a point or two in order to have a more favorable combination of letters for your next turn. These really add up throughout a game.

Ending the Game

In a very close game, end game tactics may be the deciding factor. If you can leave your opponent with some high-scoring tiles left when you go out, the point swing can be significant. Simply, you want to go out first, so:

  • Do not take exactly the remaining tiles left in the bag. For example, if there are 4 tiles left in the bag, do not make a 4 letter word. Either leave a couple in the bag so your opponent cannot go out next turn, or make as large a word as possible (hopefully 5+ letters) so you get the advantage in going out first.
  • Also, once you get down to less than 7 tiles left in the bag, start planning out your final few turns so you can go out as quickly as possible.

Pandemic Strategy Primer

If you’re reading this, I’m guessing you think there may be opportunities for improving your Pandemic winning percentage. If that is the case, you have come to the right place. If you play the game perfectly, you will win just over half of the games you play on the hardest difficulty. This is intended for the base game, but a lot of what is discussed applies to the expansions as well. For the in-depth text version, keep reading, otherwise the brief video version is immediately below.

General Tactics

The two most important tactics are:

  1. You must find a cure for at least one disease within the first 3 rounds. If you cannot do this, you will probably lose, but you have a small chance of winning if you just hold everything off and get very lucky with the card drawing and just happen to draw most of what you need for the cures. I call this the “hold down the fort” strategy, but it will only succeed with lucky draws, so it should only be used as a last resort.
  2. Once you get to two rounds left in the game, you must stop and plan out your remaining turns so that you obtain the rest of the cures. If you wait until you have 1.5 rounds left, it’s probably too late because a couple of your disease-fighters will only get one turn left, which would require them to get the remaining cards for their cure and get to a research station.  This will be very difficult.

Roles

Turn order is VERY important.

Operations Expert

The best thing you can do with this role is to throw down research facilities whenever you have an extra action and can either help someone cure a disease faster or are in an area of the world without a research facility. This role was terrible before he was much improved in the rebooted version of the Pandemic base game.

Researcher

This is probably the best role to have because the ability to transfer cards to anyone who needs them is so critical in curing disease.  They should not be using cards for transportation unless absolutely necessary because they can give them to someone to help cure a disease at some point in the game.  Also, they will never be at a point where they need to discard cards.

Dispatcher

This role is pretty much equal to the Researcher in best-ness.  Moving around the board is the greatest action point sink, so providing the ability to move more efficiently is incredibly important in speeding up your disease-curing/treating.  Moving one player to the location of another player is AMAZING.

Medic

The Medic is a close third in importance to the team.  Shipping him off to the most disease-ridden cities in the game will, if nothing else, make all the players feel a little less depressed about the current state of the world.

Scientist

This role is great, but not a necessity.  To be able to cure a disease with 4 cards instead of 5 is a very nice luxury.  They should not be using cards for transportation unless absolutely necessary because they are the primary disease-curing force on the team.

Contingency Planner

Depending on when the event cards come up in a game, this role can be either ineffective or a godsend. When playing this role, events should be used sooner to allow for the Contingency Planner to grab them and use them again. This will free up space in players’ hands too!

Quarantine Specialist

This role should head toward the most disease-ridden areas of the map, primarily in a city connected to any 3-cube cities to prevent them from outbreaking, but also in areas where you expect/know disease will spread.

Turn Order

Dispatcher -> Medic

When the Dispatcher goes before the Medic, he can move the Medic somewhere and then he can just go crazy treating/curing disease afterwards.  It is effectively 2 full turns of disease-treating, which is sometimes needed when all hell breaks loose.  After a cure has been found, the Dispatcher can just use the Medic as a vacuum cleaner to vacuum up all those cubes on the board.  If the order is reversed, the Dispatcher doesn’t really want to move the Medic because there might be more important places to cure by the time it gets to the Medic’s turn.

Researcher -> Scientist

If the Researcher is immediately before the Scientist, they can move to the Scientist’s location, give them cards they need, and the Scientist can bang out those cures.  This cannot be used very effectively if the Researcher goes immediately after the Scientist because the Researcher has to give them whatever cards they have on their turn and then 6 more cards are drawn (in a 4 player game) before it gets to the Scientist’s turn, which may have been useful to her.

Dispatcher->Researcher->Scientist

The awesome 3-role combo, which doesn’t happen very often, is Dispatcher->Researcher->Scientist so the Dispatcher can move the Researcher to the Scientist’s location from anywhere on the board.

Transportation

Finding optimal transportation between cities is paramount in Pandemic.  If you cannot do this, you will lose.  Treat every action you have like gold.

Make sure to use all methods of transportation at your disposal.  It is easy to forget about some of them, particularly the Charter Flight.  You should use all methods (Drive, Direct Flight, Charter Flight, and Shuttle Flight) in every game of Pandemic to travel optimally.

Treating Disease

Do not worry about cities with 1 or even 2 cubes on them. Having a city with 3 cubes on it is FAR worse than having one with 0, 1, or 2 on it. Send your people out to knock those 3-cube cities down to 1 or 2 cubes. You’re really just trying to “hold down the fort” until you can find the cures.

You are often faced with choosing between two different cities with 3 cubes on them. You can’t get to both of them so you have to choose one to knock down to 1-2 cubes and one to leave for another turn in hopes that it will not be drawn from the infection deck. These are the factors you should consider when deciding, in order of importance:

1)      Is one city closer to the top of the infection deck? If so, and you do not expect to draw an epidemic, treat that city. Or, if you highly anticipate an epidemic card to be drawn on this turn, choose a city that is in the infection discard pile instead of one still in the deck.

2)      If they fall into the same category for #1, choose the one connected to the most 3-cube cities.

3)      If they again fall into the same category for #2, treat the one with more vectors to other cities.

4)      If the cities are still even, flip a coin… and pray.

If you find a cure for a disease early in the game, try to eradicate it, but if it’s later in the game, don’t worry about it and just try to get the other cures unless eradication is fairly easy.

The Infection Deck

Knowing the contents of this deck is INCREDIBLY important.

Keep in mind (or memorize, if possible) which cards are on top of the infection deck so you can preemptively cure diseases there, keep them from outbreaking, and keep your disease-fighters close to them.

Once the infection rate gets up to 3 and 4, this gets much harder, but before then, you should know every card that is near the top of this deck so you know where to position your forces.

Special Event Cards

Save these until the later stages of the game unless you risk utter devastation if you do not.

Play One Quiet Night and Resilient Population immediately after an epidemic card is drawn, especially if it is when the infection rate increases to 3 or 4.  Pretty much never use this when an epidemic card has not been drawn.  If you feel this is required, you are doing something wrong.

Use the Forecast card after an epidemic card is drawn, but before the infection cards are drawn.

Airlift should usually be used when you need to get someone somewhere to give a card to someone about to cure a disease, often in conjunction with the Dispatcher.

Cures and Eradication

If you do not have 5 of every color of uncured disease in the collective hand of the disease-fighters, this is a problem.  Do not use too many cards for transportation purposes until that color disease has been cured.  Once you have at least 5 of each color disease, you now have a chance to win the game.

If you have 3 or more of a particular color card in your hand, you might want to start making your way over to that part of the world to make it easier for other players to give you cards to complete your set of 5. (or 4 if you are the Scientist)  This is less important if you have a Dispatcher on the team.

It often makes sense to just go for an all-out cure strategy near the end of the game if your outbreak meter is not too high.

If you cannot eradicate a disease in the next two consecutive turns, do not bother and work towards finding cures and saving cities from outbreaks.  Eradication is great, but spending an entire round to do it is a waste.

Tuning Your Strategies

You won’t win every game when you start playing.  In fact, you will lose most of them.  If you notice yourself losing from the Outbreak Meter every time, make sure you focus on making sure no city ever has 3 cubes on it when you draw from the infection deck (or as close to this as possible).  If you always run out of player cards, focus more on curing diseases quicker and improving your turn efficiency.  If you always run out of cubes of one color, make sure you aren’t concentrating too much on a particular disease.  Once you fix the source of your losing one way and you start losing another way, that’s good!  Now fix why you are losing using your current tactics.

Conclusion

You have to remain adaptable in every game when the deck throws its worst at you.  You have to be able to weather the storm and cure those diseases because chaos now often means a reprieve in the near future.

Takenoko Strategy Primer

Takenoko is a light strategy game by the amazing Antoine Bauza. It serves as another great gateway game that helps get your softcore gamer friends to play a strategy game with you because who can turn down a game about a fluffy, giant panda who eats bamboo, especially when lightning scares him into eating more as a coping mechanism? This games is fairly luck-based, but there are some important strategies to understand that will help improve your winning percentage. You can view the video version immediately below or keep reading for the text version of this analysis.

Strategies

Plot Rush

The best strategy, if it works for you, is to rush. You ALWAYS want to start by attempting this one. Use the Objective action to draw your second and third Plot objectives right away while performing Plot actions to build the board to meet the patterns you need. There are not that many different patterns in the Plot objectives, so your opponents will help you complete them. If you can complete them quickly, continue drawing more Plot objectives to rush through to the end of the game. If you do not complete the first few right away, you will have to switch to a more balanced strategy of drawing Gardner and Plot objectives, but usually, you will speed your way to the end and win by a landslide. Your objectives will have fewer points, but you will win way before your opponents so you should still easily have more points in total. The only Gardner objective you will have is the one from your starting hand while you should alway have a single Panda objective to which you can apply bamboo you obtain through Lightning weather rolls. This strategy is a little less effective in the Advanced Variant where you discard any already-completed objectives when they are drawn and draw a new one, but even when you play with this rule, you should still attempt this strategy in every game.

Bamboo Pruning

In this strategy, you focus on the Gardner and Panda objectives. You use the Gardner actions to grow the bamboo you need for Gardener Objectives and then Panda actions to prune them to the correct size. Panda objectives can often be very quick to complete and these two both have high point rewards, so overall, you will have a higher average number of points per completed objective than someone going for Plot objectives too. The only Plot objective you should have with this strategy is the one you get in your starting hand. Ideally, you have two Panda objectives and three Gardner objectives in your hand at all times to guide your growing and eating.

General Tactics

When you get a question mark on the weather roll, you almost always want to choose the Sun to get an extra action unless something like a Wind will let you end the game. The Sun will do wonders for your turn efficiency.

Never place irrigation channels on the board unless it will immediately complete an object for you that you need out of your hand and you do not think other players will complete it for you. Hopefully someone will irrigate part of it (or all of it), which will allow you to irrigate something else later. Placing channels before they actually complete something for you is a complete waste and may very likely help an opponent.

No matter which strategy you are using, always keep a Panda objective in your hand because the weather rolls might give you an opportunity to move the panda without using an action and you do not want to waste them.

Once you become familiar with the game, you will know which Panda, Plot, and, albeit less-so, Gardner objectives your opponents have based on the actions they take. Use this information to hinder their progress whenever you can without forfeiting your own, especially when you can target the player(s) in the lead.

Once objectives are completed, they remain face-up, so you always know exactly where you stand compared to others at all times. Once you get within 3 objectives from ending the game or your opponents are within 2 objectives from completing it, count everyone’s points and plan out your final turns so you can maximize your points. I know it is tempting to keep your head down and blindly working through each objective, but you need to do some serious planning in your final turns to give yourself the best chance to win.

Star Trek Catan Strategy Primer

This game is vicious compared to the original Catan as there is way more stealing and everyone is fighting over the use of the same support cards. There is also a steeper learning curve because players must constantly choose from that pile of support cards by reading all of them, understanding them, and then deciding which is best for their current situation. This leads to some longer play times and some newbie frustration. Still, the Star Trek theme adds some spice to the original Catan and the support cards relieve players from some of the reliance on luck since each of them fixes a scenario where a player may have felt like they were “screwed by the game.” Continue reading for the text version, or if you prefer, there is also a video version:

Please see my analysis on the original Catan for more details on each strategy as I will focus more on the differences between Star Trek Catan and the original in this analysis. Even though the resource colors are almost the same, they do not match up exactly to the original. For example, green Dilithium matches up to Brick in the original and white Oxygen matches up to Wheat/Grain. Here is the full mapping:

  • Dilithium (green) = Brick/Clay
  • Food (yellow) = Sheep/Wool
  • Oxygen (white) = Wheat/Grain
  • Tritanium (red) = Lumber
  • Water (blue) = Ore/Rock
  • Asteroid Field = Desert

Strategies

Longest Supply Route

As in the original Catan, this is an acceptable strategy for newbies: Just use Montgomery Scott to build a bunch of starships and solidify the Longest Supply Route bonus while getting outposts and starbases as resources allow. This is not an advisable strategy for moderate to advanced players because it is not flexible and will leave you without a very good resource base to get you from 7 points up to 10. It’s nice for new players because they can focus on a subset of the game and not worry too much about the rest of the complexity. Sulu can also be useful to re-direct misplaced starships every now and then, plus Uhura can force trades for your needed dilithium and tritanium while keeping it out of the hands of any opponents who may be challenging you for the Longest Supply Route.

If you use it, be careful not to become entrenched in a battle for the Longest Supply Route that sucks up all of your resources while your opponents build cheaper, more sustainable sources of victory points. You should only go for this if you are commanding the Dilithium and Tritanium markets and can build roads far easier than others. This strategy also requires that you keep at least a 3 starship advantage over opponents so they cannot use Utopia Planitia to build and an additional starship to steal the bonus out from under you.

Largest Starfleet

Here, you are trying to gain the Largest Starfleet bonus by buying up a bunch of development cards, which help you control the game by playing each one when it will benefit your endeavors. This strategy is a bit easier in this version of Catan because of the almighty Leonard McCoy. Any time he is available, you will want to grab him, which means your alternate support card should be one that allows you to quickly get rid of it when he is available, like Uhura, Chekov, or Janice Rand. This is the most flexible strategy in the game and the one I highly recommend as long as your opponents do not realize the godliness of McCoy and he is frequently available.

Trading Post

In this strategy, you usually commit to it during initial outpost placement. You realize you can gain access to an immense supply of a particular resource while also grabbing its corresponding trading post as your first expansion outpost. This strategy is more advanced because you need to be able to see the opportunity during initial placement, place wisely while hoping others do not interfere with your placement, and then have access to enough dilithium and tritanium (and/or Scott) to make your way over to your resource’s trading post before someone else beats you to it.

Oxygen Monopoly

This is comparable to the Wheat Monopoly strategy in the original Catan. The popular slogan is “No Wheat Means Defeat” since you need it to buy development cards, settlements, and cities. Oxygen is the comparable resource in Catan so if there is very little of it in the game or a single hex that has a high-rolled number, you can cut your opponents off from it as long as you never trade it to them. This strategy is rendered pretty much unusable in Star Trek Catan because most of the support cards provide ways to get resources that you would otherwise be unable to produce. You can still use this strategy secondarily to force your opponents to use support card abilities for Oxygen instead of something else, but you need a primary strategy to get yourself to 10 points.

Support Cards

The support cards offer tools, protection, and weapons to avoid some of the annoyances of original Catan or attack your opponents. I will describe each one in terms of how they protect you against certain random, or self-imposed, hindrances from the original.

Spock

Spock protects from you from being “screwed by the dice rolls” as was common in the original. This is the best (on par with McCoy) support card early in the game to make sure you can get to your first expansion outpost. He gets worse mid-game, pretty much after you build your first expansion outpost, and is unusable in the late game because you will frequently be stuck with him for multiple rounds as the frequency of resource production increases for you. Also, if you fail to put an outpost on every type of resource to start the game, Spock lets you get those resources you otherwise have no chance of producing.

James T. Kirk

Kirk protects you from losing half your resource hand to the robber. He is not very useful early in the game because you only have a 16.66% chance of rolling a 7 on each dice roll, and you won’t have over 7 cards early in the game, so you will likely go around at least once without using him, which means you would be better off with one of the other support cards. His value increases when your chance of losing half your hand to the Klingon Battlecruiser increases, and is a great pick-up whenever you have 8-9 points and are just trying to grab your last point or two because you know your resource hand is safe from the Klingons.

Uhura

Uhura protects you from your opponents refusing to trade resources that you need. She makes the Wheat Monopoly strategy from the original almost unusable in this version. She is very good because, as some cards give you discounts or advantages for yourself, she gives you an advantage and two of your opponents a disadvantage. She is always a support card to have in front of you.

Hikaru Sulu

Sulu protects you from misplacing starships and opponents cutting you off. He is useful for the first round or two, but then is only useful in very specific situations where one of your starships will be unusable in its current location. In general, there are usually better support cards to acquire than poor, Mr. Sulu. The main reason you get him is to explain, “Oh, My!” when you use his ability.

Pavel Chekov

Chekov protects you from the Klingon embargo. If your play steers you away from picking up development cards or you just do not get Starfleet Intervenes, Chekov can be a good play to send the Battlecruiser back to the asteroid field. Not only do you free up your resource location for future dice rolls, but you also get a free resource out of it. He is a particularly good pick if you see that the Klingon is on a resource that you will likely need on your next turn.

Christine Chapel

Chapel protects other players from pulling out to an insurmountable lead and allows everyone to be relevant in the final rounds. She makes having lots of points early worse than in Catan, not that it was very good in that game either, but it’s way worse here if your opponents like using her ability. It helps in mitigation to avoid grabbing the 2 point bonus tiles until you’re about to win. Obviously you should use this support card when someone is getting near winning and you need to stall them. Having someone steal any resource from your hand can make it very difficult to get your final point or two. Also encourage your opponents to team up against the winning player(s) by using Chapel to suck up their valuable resources.

Montgomery Scott

Scott is very useful early in the game, especially if you are having trouble getting Dilithium and Tritanium to expand to new outposts. Later in the game as expansion slows, you will have better options for your support cards unless you find yourself squandering your resources in a battle for the Longest Supply Route for some reason.

Leonard McCoy

This is the overall best support card in the game. The ability to replace 1 resource with another in the cost of a dev card is good enough, but then to look at the top 3 cards and choose the one you want is unbelievably good. If you find a victory point card when using him, you usually want to grab it because having hidden victory points is even more valuable in this game than others because Christine Chapel can really hurt the players in the lead.

Sarek

This support card will not be used by most people, especially newbies. You pretty much need to go for almost strictly development cards using Leonard McCoy to get enough Starfleet Intervenes cards to make use of his 2 resource discount on a starbase or outpost. Even so, you’re trading something that was 3 resources to buy and only gives a 2 resource discount, so you’re really paying for the flexibility he provides. The biggest drawback of Sarek is it’s easy, especially for a new player, to get stuck with him when his owner plays his/her last Starfleet Intervenes to move the Klingon Battlecruiser, leaving a worthless support card taking up space that could be occupied by one that will give you an advantage in the game.

Janice Rand

If you have a lot of similar resource production locations, this card can be a huge benefit by giving you a 2:1 trading ratio and helping get you some resources you would otherwise not be able to produce. Hopefully you do not get yourself into a position where you do not have access to specific resources in the first place and you can ignore her for the entire game.

General Tactics

Keep your cards a secret because there is a lot more stealing.  When someone asks you, “Do you have any tritanium?”  You respond, “I have none for trade,” no matter whether you do or do not have any.  In the same vein, it is MUCH more important to watch which resources each player produces so you can steal what you need.  Also, use social engineering to try to pull information out of you opponents about what they have.  When you ask if they have any tritanium, you are hoping they respond with information such as, “I have 1 but it’s not for trade.”  Of course, you can take your responses to the next level  if you are so inclined and start lying about what you have, so if someone who has Uhura is phishing for information, give them incorrect information like talking about all your water that you don’t possess.  It’s also more important to remember what your opponents have in their hand because you will have opportunities to steal from them.

When choosing your seat at the table, if you know someone is very development card happy, you want them on your right…  not on your left.  You can expect they will frequently play starfleet cards and move the Klingon battle cruiser, which will be annoying if you keep moving it off of your hexes and then they move it right back on there on the following turn.

As in the original Catan, Tritanium (red) and Dilithium (green) are the most important resources early in the game to build on space routes and claim territory before opponents move in on it.  Oxygen (white) and Water (blue) become more valuable later in the game to upgrade outposts to starbases.

Also as in the original, if you have 9 points, do NOT draw dev cards to get your final victory point. This is even more important in this version because those using McCoy throughout the game probably sucked the development deck dry of victory points.

Christine Chapel makes being in the lead early even worse than in the original so it is very important to stay under the radar in this version.

As in the original, and more importantly in this one, just be nice. Your opponents will have many opportunities to hurt you or help you, so make sure your meta game actions do not make you a target. Maybe compliment them on their shoes or their haircut. Give them a hug…. or a hamburger. You know what they would like more so than me.